| 일 | 월 | 화 | 수 | 목 | 금 | 토 |
|---|---|---|---|---|---|---|
| 1 | 2 | 3 | 4 | 5 | 6 | 7 |
| 8 | 9 | 10 | 11 | 12 | 13 | 14 |
| 15 | 16 | 17 | 18 | 19 | 20 | 21 |
| 22 | 23 | 24 | 25 | 26 | 27 | 28 |
- 스택머신
- 스트리밍 아키텍쳐
- 핵심 데이터 모델링
- SpanId
- 리눅스
- 추적 데이터 마이닝 파이프라인
- jack 문법
- 도커
- 분산추적
- nandtotetris
- APM 만들기
- vm번역기
- 구문 분석
- 밑바닥부터 만드는 컴퓨팅 시스템
- 컴퓨터 아키텍쳐
- 시간 윈도우
- 메모리 세그먼트
- apm
- 텀블링 윈도우
- OTEL
- 스트리밍 데이터 아키텍쳐
- vm머신
- Terraform
- MySQL
- ec2
- 실시간 스트리밍 데이터
- 마운트
- 피벗 추적
- s3
- InnoDB
- Today
- Total
이것이 점프 투 공작소
ALB와 ASG 만들기 with Terraform 본문

version.tf
provider "aws" {
  region = "ap-northeast-2"
}
vpc.tf
resource "aws_vpc" "vpc" {
  cidr_block = "10.0.0.0/16"

  tags = {
    Name = "asg-vpc"
  }
}
vpc를 생성합니다.
igw.tf
resource "aws_internet_gateway" "IGW" {
  vpc_id = aws_vpc.vpc.id
  tags = {
    "Name" = "IGW"
  }
}
현재 코드에서는 private_subnet에 ec2을 사용하지는 않아 필요없지만 추후에 추가될 인스턴스를 위해 미리 생성했습니다.
subnet.tf
# subnet.tf
resource "aws_subnet" "publicSubnet1" {
  vpc_id            = aws_vpc.vpc.id
  cidr_block        = "10.0.0.0/24"
  availability_zone = "ap-northeast-2a"
  tags = {
    "Name" = "test-public-subnet-01"
  }
}

resource "aws_subnet" "publicSubnet2" {
  vpc_id            = aws_vpc.vpc.id
  cidr_block        = "10.0.1.0/24"
  availability_zone = "ap-northeast-2c"
  tags = {
    "Name" = "test-public-subnet-02"
  }
}

#EIP
resource "aws_eip" "nat" {
    vpc = true
}

# Nat gateway
resource "aws_nat_gateway" "nat_gw" {
    allocation_id	= aws_eip.nat.id
    subnet_id 		= aws_subnet.publicSubnet1.id

    depends_on = [aws_internet_gateway.IGW]
}

#EIP
resource "aws_eip" "nat2" {
    vpc = true
}

# Nat gateway
resource "aws_nat_gateway" "nat_gw2" {
    allocation_id	= aws_eip.nat2.id
    subnet_id 		= aws_subnet.publicSubnet2.id

    depends_on = [aws_internet_gateway.IGW]
}


## private subnet
resource "aws_subnet" "privateSubnet1" {
  vpc_id            = aws_vpc.vpc.id
  cidr_block        = "10.0.4.0/24"
  availability_zone = "ap-northeast-2a"
  tags = {
    "Name" = "private-subnet-01"
  }
}

resource "aws_subnet" "privateSubnet2" {
  vpc_id            = aws_vpc.vpc.id
  cidr_block        = "10.0.5.0/24"
  availability_zone = "ap-northeast-2c"
  tags = {
    "Name" = "private-subnet-02"
  }
}
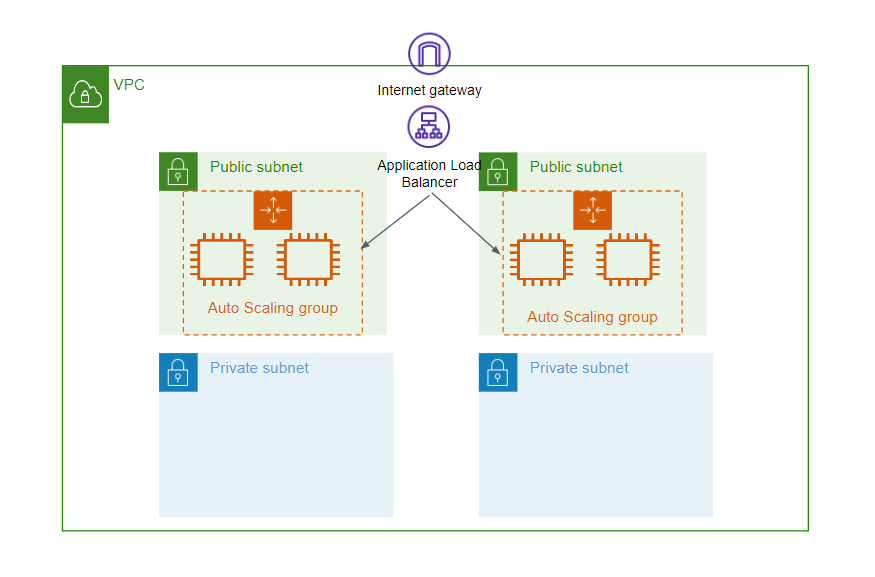
2개의 가용영역에 private_subnet과 public_subnet을 생성합니다.
route.tf
# public라우트테이블
resource "aws_route_table" "testPublicRTb" {
  vpc_id = aws_vpc.vpc.id

  route {
    cidr_block = "0.0.0.0/0"
    gateway_id = aws_internet_gateway.IGW.id
  }

  tags = {
    "Name" = "test-public-rtb"
  }
}

#private라우트테이블
resource "aws_route_table" "testPrivateRTb" {
  vpc_id                 = aws_vpc.vpc.id

  route {
    cidr_block = "0.0.0.0/0"
    nat_gateway_id         = aws_nat_gateway.nat_gw.id
  }

  tags = {
    "Name" = "test-private-rtb"
  }
}

# route subnet associate 라우팅테이블과 서브넷을 연결합니다.
resource "aws_route_table_association" "publicAssociation01" {
  subnet_id      = aws_subnet.publicSubnet1.id
  route_table_id = aws_route_table.testPublicRTb.id
}

resource "aws_route_table_association" "privateAssociation01" {
  subnet_id      = aws_subnet.privateSubnet1.id
  route_table_id = aws_route_table.testPrivateRTb.id
}

resource "aws_route_table_association" "publicAssociation02" {
  subnet_id      = aws_subnet.publicSubnet2.id
  route_table_id = aws_route_table.testPublicRTb.id
}

resource "aws_route_table_association" "privateAssociation02" {
  subnet_id      = aws_subnet.privateSubnet2.id
  route_table_id = aws_route_table.testPrivateRTb.id
}
private_subnet의 인스턴트들이 인터넷을 사용 할 수 있도록 nat_gateway를 할당하고, 로컬대역 외 트레픽은 인터넷으로 보내도록 public_subnet에 internet_gateway를 할당합니다.
SG.tf
# public Seucurity Group
resource "aws_security_group" "publicSG01" {
  name        = "public-sg-01"
  description = "Allow all HTTP"
  vpc_id      = aws_vpc.vpc.id

  ingress {
    description = "http port"
    protocol    = "tcp"
    from_port   = 80
    to_port     = 80
    cidr_blocks = ["0.0.0.0/0"]
  }

  ingress {
    description = "docker nginx port"
    protocol    = "tcp"
    from_port   = 8080
    to_port     = 8080
    cidr_blocks = ["0.0.0.0/0"]
  }

  ingress {
    description = "ssh port"
    protocol    = "tcp"
    from_port   = 22
    to_port     = 22
    cidr_blocks = ["0.0.0.0/0"]
  }

  egress {
    cidr_blocks = ["0.0.0.0/0"]
    from_port   = 0
    protocol    = "-1"
    to_port     = 0
  }
}
ALB와 EC2에 할당할 SG를 생성합니다. 도커로 nginx를 사용할 계획이므로 8080포트를 따로 만들었습니다.
alb.tf
resource "aws_alb" "test" {
  name                             = "test-alb"
  internal                         = false
  load_balancer_type               = "application"
  security_groups                  = [aws_security_group.publicSG01.id]
  subnets                          = [aws_subnet.publicSubnet1.id, aws_subnet.publicSubnet2.id]
  enable_cross_zone_load_balancing = true
}

# alb에서 트레픽을 보낼 인스턴스 대상 그룹
# 인스턴스 대상그룹에게 alb에서 8080포트로 트레픽을 보냅니다.
resource "aws_alb_target_group" "test" {
  name     = "alb-target"
  port     = 8080
  protocol = "HTTP"
  vpc_id   = aws_vpc.vpc.id

  # target_group의 인스턴스의 health_check를 설정합니다.
  health_check {
	interval	= 15
	path		= "/"
	port		= 8080
	healthy_threshold = 3
	unhealthy_threshold = 3
  }
}

# alb의 리스너
resource "aws_alb_listener" "test" {
  load_balancer_arn = aws_alb.test.arn
  port              = 80
  protocol          = "HTTP"

  default_action {
    type             = "forward"
    target_group_arn = aws_alb_target_group.test.arn
  }
}
aws_alb
ALB 2개의 서브넷을 할당 후 enable_cross_zone_load_balancing를 true로 설정하여 교차영역 로드밸런싱을 활성화 합니다.
aws_alb_target_group
ALB에서 트레픽을 라우팅할 그룹을 설정합니다, target_type을 설정해주지 않으면 기본값 instance로 설정됩니다
aws_alb_listener
ALB의 리스너는 HTTP와 HTTPS에 해당하는 요청을 받아들이며, HTTP 관련 정보를 해석할 수 있습니다. 그 정보를 기반으로 어느 대상그룹에 요청을 전달할 것인지 규칙을 세우고 라우팅을 실시합니다, ALB_Listener는 필요하다면 HTTP와 HTTPS를 각각 따로 생성해야합니다.
default_action : ALB의 리스너 요청의 기본 동작을 설정합니다, type = "forward"를 통해 target_group_arn으로 ALB의 트레픽을 라우팅합니다.
asg.tf
resource "aws_autoscaling_group" "asg-01" {
  name                      = "asg-test"
  min_size                  = 4
  max_size                  = 6
  health_check_grace_period = 500
  health_check_type         = "ELB"
  desired_capacity          = 4
  force_delete              = true
  target_group_arns         = [aws_alb_target_group.test.arn]
  launch_configuration      = aws_launch_configuration.ec2.name
  vpc_zone_identifier       = [aws_subnet.publicSubnet1.id, aws_subnet.publicSubnet2.id] # asg에 대한 가용역역
}

data "aws_ami" "ubuntu"{
  most_recent = true
  filter {
    name   = "name"
    values = ["ubuntu/images/hvm-ssd/ubuntu-focal-20.04-amd64-server-*"]
  }
  filter {
    name   = "virtualization-type"
    values = ["hvm"]
  }
  owners = ["099720109477"]
}


resource "aws_launch_configuration" "ec2" {

  image_id	= data.aws_ami.ubuntu.image_id
  instance_type = "t2.micro"
  key_name      = "keykey"

  security_groups             = [aws_security_group.publicSG01.id]
  associate_public_ip_address = true

  user_data	= <<-EOF
		#! bin/bash
		sudo apt update -y
		sudo apt install docker.io -y
		sudo systemctl enable docker.service
		sudo mkdir -p /var/web
		echo "<h1> Hello ALB </h1>" | sudo tee /var/web/index.html
		sudo docker run --name nginx -v /var/web:/usr/share/nginx/html -d -p 8080:80 nginx
			EOF

  lifecycle {
    create_before_destroy = true
  }
}
aws_autoscaling_group
aws_autocaciling_group에서 health_check_type을 ELB로 설정하면 health_check에 의해 인스턴스의 상태를 체크합니다, 기본값은 EC2로 설정하게되면 해당 VM이 완전히 다운되었을때 상태체크가 실패하게됩니다.
aws_launch_configuration에서 create_before_destroy를 true로 설정하여 ASG에서 인스턴스를 삭제하기 전에 먼저 새로운 인스턴스를 생성하도록 합니다.
대상그룹 상태확인
2개의 가용영역에 각각 2개의 인스턴스를 확인 할 수 있습니다.

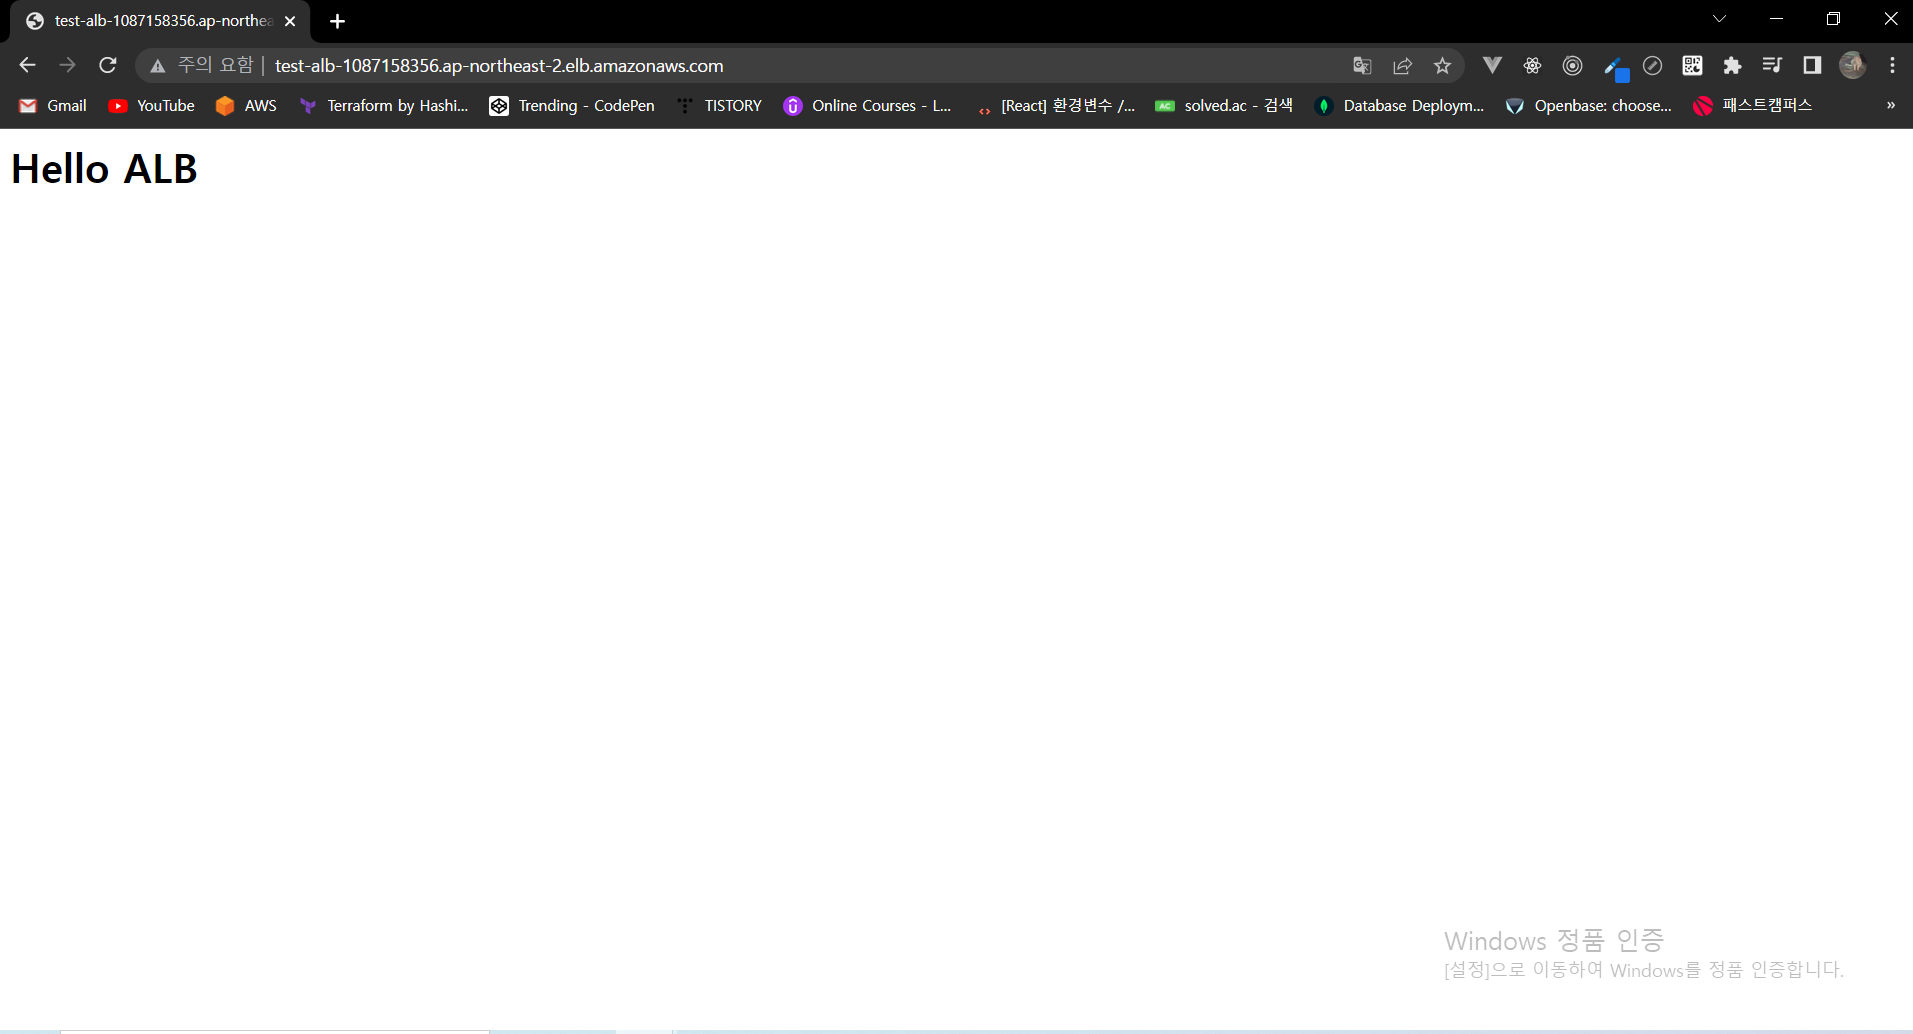
ALB도메인으로 접속
ALB 도메인으로 접속하여 ngixn웹서버에 접속 할 수 있습니다.

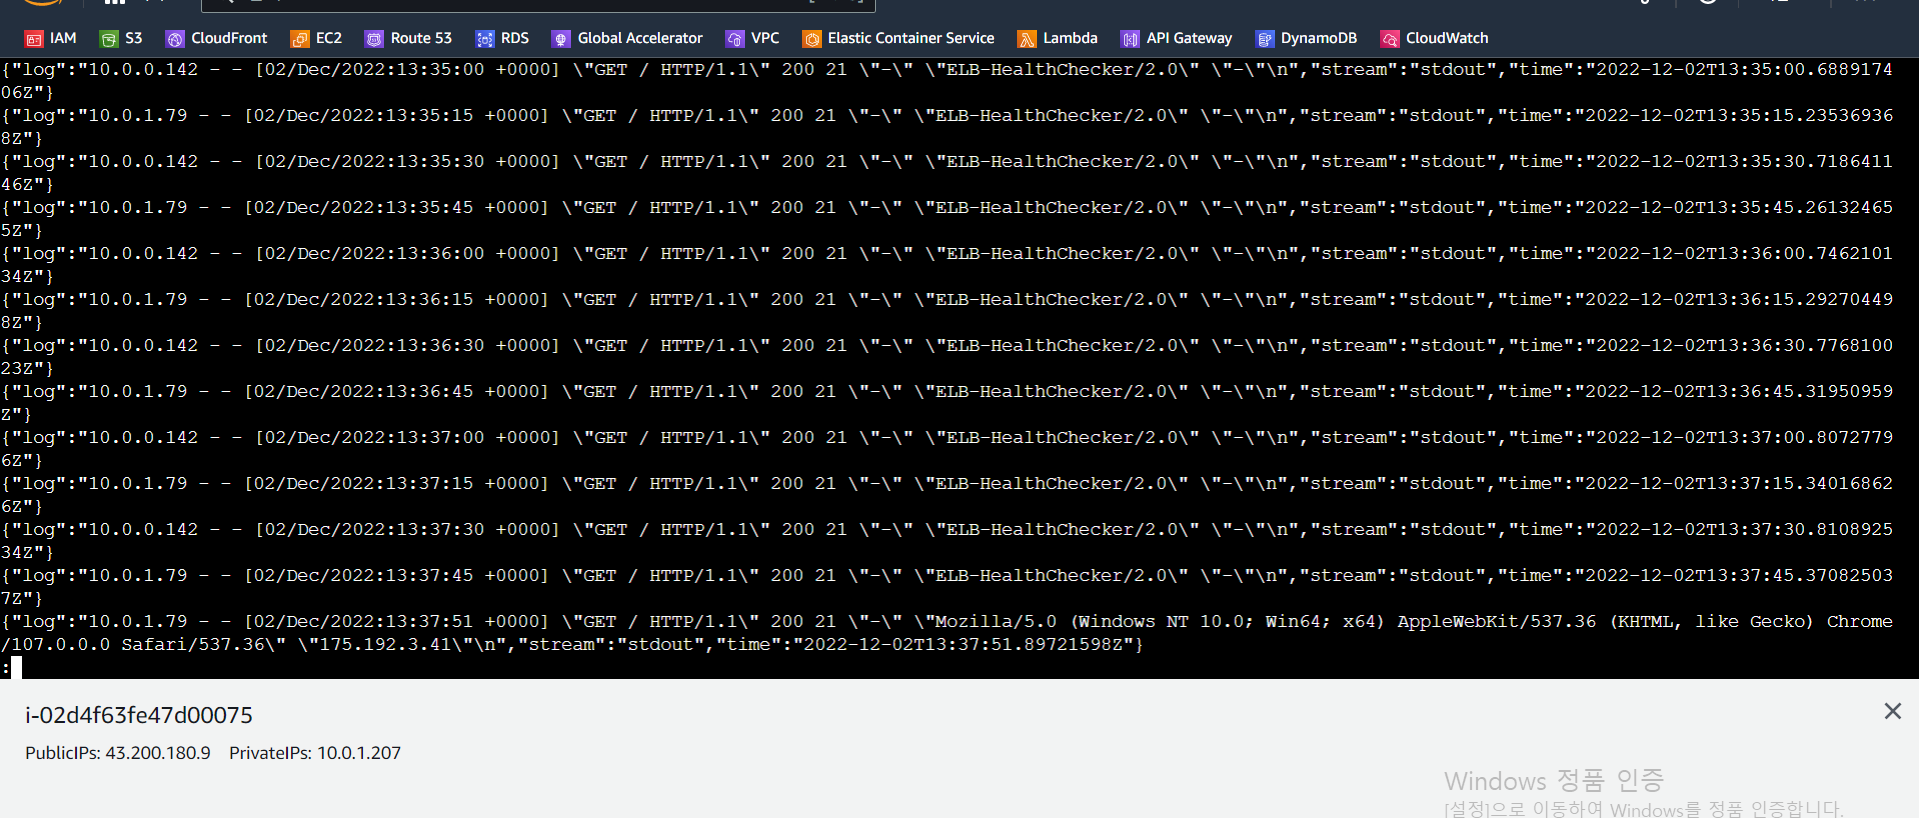
EC2에 docker 컨테이너 로그 확인
health_check와 접속에 대한 로그 또한 정상적으로 확인했습니다.

'aws' 카테고리의 다른 글
| VPC의 리소스들에 대해 알아보자 (0) | 2023.04.16 |
|---|---|
| CI/CD Pipeline - AWS CodePipeline을 통한 CICD 해보기 with Terraform (0) | 2023.03.05 |
| EC2에 MFA(Google-Athenticator)를 사용한 Bastian Host만들기 with Terraform (0) | 2022.11.12 |
| EC2에 EBS볼륨(LVM) 마운트하여 사용하기 (0) | 2022.10.23 |
| AWS NAT gateway란? (0) | 2022.09.26 |


