


| 일 | 월 | 화 | 수 | 목 | 금 | 토 |
|---|---|---|---|---|---|---|
| 1 | 2 | 3 | 4 | 5 | 6 | |
| 7 | 8 | 9 | 10 | 11 | 12 | 13 |
| 14 | 15 | 16 | 17 | 18 | 19 | 20 |
| 21 | 22 | 23 | 24 | 25 | 26 | 27 |
| 28 | 29 | 30 |
- jack 문법
- 마운트
- APM 만들기
- 리눅스
- 스택머신
- vm머신
- 핵심 데이터 모델링
- 스트리밍 아키텍쳐
- InnoDB
- 텀블링 윈도우
- 실시간 스트리밍 데이터
- apm
- 컴퓨터 아키텍쳐
- Terraform
- MySQL
- 메모리 세그먼트
- 추적 데이터 마이닝 파이프라인
- 도커
- 구문 분석
- ec2
- s3
- 피벗 추적
- 밑바닥부터 만드는 컴퓨팅 시스템
- SpanId
- nandtotetris
- vm번역기
- 스트리밍 데이터 아키텍쳐
- 분산추적
- 시간 윈도우
- OTEL
- Today
- Total
이것이 점프 투 공작소
EC2에 MFA(Google-Athenticator)를 사용한 Bastian Host만들기 with Terraform 본문

Bastian Host 구성목록
VPC
provider "aws" {
    region = "ap-northeast-2"
}

# vpc
resource "aws_vpc" "main" {
    # IPv4의 CIDR블록을 지정합니다.
    cidr_block          = "10.0.0.0/16"

    tags = {
        Name = "OPT-Practice-VPC"
    }
}


# IGW
resource "aws_internet_gateway" "igw" {
    vpc_id = aws_vpc.main.id
    tags = {
        Name = "IGW"
    }
}

#Elastic IP
resource "aws_eip" "nat" {
    #EIP가 VPC내에 있는 경우 true
    vpc = true
}
Public Subnet
# public subnet
resource "aws_subnet" "public_subnet" {
    vpc_id              = aws_vpc.main.id
    cidr_block          = "10.0.1.0/24"

    # 서브넷으로 시작된 인스턴스에 퍼블릭 주소를 할당할지 여부 기본값false
    map_public_ip_on_launch = true
    availability_zone   = "ap-northeast-2a"

    tags = {
        Name = "OPT-Practice-public-subnet"
    }
}

# Nat gateway
resource "aws_nat_gateway" "nat_gw" {
    # 선택된 Nat Gateway에 할당할 EIP
    allocation_id       = aws_eip.nat.id
    subnet_id           = aws_subnet.public_subnet.id
}


# public route table
resource "aws_route_table" "public_rtb" {
    vpc_id      = aws_vpc.main.id

    tags = {
        Name = "Public rtb"
    }
}

# route규칙
resource "aws_route" "public_rtb" {
    route_table_id              = aws_route_table.public_rtb.id
    # 목적지 cidr_block
    destination_cidr_block      = "0.0.0.0/0"
    # 라우팅 테이블에 연결된 인터넷 게이트웨이 또는 가성 사설 게이트웨이
    gateway_id                  = aws_internet_gateway.igw.id
}

# 라우팅 테이블과 서브넷 또는 인터넷 게이트웨이, 가상 프라이빗 게이트웨이간 연결 설정 리소스
resource "aws_route_table_association" "public_rtb" {
    subnet_id                   = aws_subnet.public_subnet.id
    route_table_id              = aws_route_table.public_rtb.id
}
Private Subnet
#private_subnet
resource "aws_subnet" "private_subnet" {
  vpc_id            = aws_vpc.main.id
  cidr_block        = "10.0.10.0/24"
  availability_zone     = "ap-northeast-2a"
  tags = {
    Name = "Private Subnet"
  }
}

# private route table
resource "aws_route_table" "private_rtb" {
  vpc_id = aws_vpc.main.id

  tags = {
    Name = "Private rtb"
  }
}

resource "aws_route" "private_rtb" {
  route_table_id         = aws_route_table.private_rtb.id
  destination_cidr_block = "0.0.0.0/0"
  nat_gateway_id         = aws_nat_gateway.nat_gw.id
}

resource "aws_route_table_association" "private_rtb" {
  subnet_id      = aws_subnet.private_subnet.id
  route_table_id = aws_route_table.private_rtb.id
}
EC2
data "aws_ami" "ubuntu"{
  most_recent = true

  # filter_block은 원하는 data 중 원하는 data로 필터링하기위한 명령어
  # name 필터로 우분투20.04이미지로 필터링
  filter {
    name   = "name"
    values = ["ubuntu/images/hvm-ssd/ubuntu-focal-20.04-amd64-server-*"]
  }

  filter {
    # AMI의 가상화 유형 (hvm , paravitual)
    name   = "virtualization-type"
    values = ["hvm"]
  }
  # 검색을 제한할 AMI 소유자 목록
  owners = ["099720109477"] # Canonical
}


resource "aws_instance" "public-ec2" {
  ami           = data.aws_ami.ubuntu.image_id
  instance_type = "t2.micro"
  key_name      = "keykey"
  subnet_id = aws_subnet.public_subnet.id
  vpc_security_group_ids = ["${aws_security_group.OPT-SG.id}"]

  # user_data를 이용해 libpam-google-authenticator를 설치합니다.
  user_data = <<-EOF
                 #!/bin/bash
                 sudo apt update
                 sudo apt install -y libpam-google-authenticator
                 EOF
  tags = {
    Name = "OPT-Instance"
  }
  depends_on = ["aws_internet_gateway.igw"]
}


resource "aws_instance" "private-ec2" {
  ami           = data.aws_ami.ubuntu.image_id
  instance_type = "t2.micro"
  key_name      = "keykey"
  subnet_id = aws_subnet.private_subnet.id
  vpc_security_group_ids = ["${aws_security_group.private-sg.id}"]

  tags = {
    Name = "OPT-private-Instance"
  }
}
Security Group
resource "aws_security_group" "OPT-SG" {
    name        = "OPT-SG"
    description = "allow 22, 80"
    vpc_id      = aws_vpc.main.id
}

resource "aws_security_group" "private-SG" {
    name        = "OPT-SG-Private"
    description = "allow 22 from publicEC2"
    vpc_id      = aws_vpc.main.id
}


#public rule
resource "aws_security_group_rule" "OPT-SG-rule-ssh" {
    # ingress : 수신규칙
    type        = "ingress"
    # 시작포트
    from_port   = 22
    # 끝 범위 포트
    to_port     = 22
    protocol    = "tcp"
    cidr_blocks = ["0.0.0.0/0"]
    security_group_id = aws_security_group.OPT-SG.id
}

#public rule
resource "aws_security_group_rule" "OPT-SG-rule-outbound-public" {
    # egress : 송신규칙
    type        = "egress"
    from_port   = 0
    to_port     = 0
    #  "-1"은 모두 허용
    protocol    = "-1"
    cidr_blocks = ["0.0.0.0/0"]
    security_group_id   = aws_security_group.OPT-SG.id
}

#private rule
resource "aws_security_group_rule" "private-SG-rule-ssh" {
    type        = "ingress"
    from_port   = 22
    to_port     = 22
    protocol    = "tcp"
    source_security_group_id    = aws_security_group.OPT-SG.id
    security_group_id = aws_security_group.private-SG.id
    description = "ssh"
}

#private rule
resource "aws_security_group_rule" "private-SG-rule-outbound-public" {
    type        = "egress"
    from_port   = 0
    to_port     = 0
    protocol    = "-1"
    cidr_blocks = ["0.0.0.0/0"]
    security_group_id   = aws_security_group.private-SG.id
    description = "outbound"
}
Terraform apply 실행
ssh로 bastian host접속 후 google-authenticator 실행

bastian host접속 후 google-authenticator를 실행하면

secret key를 받을 수 있습니다.
모바일로 사용하시려면 QR을 등록하시면 되고
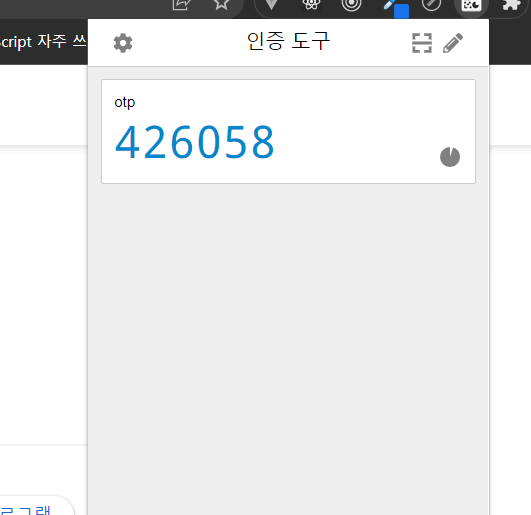
브라우저를 사용하시려면 크롬 확장도구인 google-authenticator에 secret-key를 통해 opt를 등록하실 수 있습니다.
https://chrome.google.com/webstore/detail/authenticator/bhghoamapcdpbohphigoooaddinpkbai
인증 도구
인증 도구는 브라우저에서 2단계 인증 코드를 생성합니다.
chrome.google.com
확장도구를 설치하셨으면 확장프로그램 설정에서 secret-key를 입력해주시면 됩니다

OPT를 사용할 EC2(Bastian host)의 pam.d/sshd 파일 수정
PAM(Pluggable Authentication Modules)이란?
사용자를 응용 프로그램 또는 서비스에서 동적으로 인증하는데 사용하는 라이브러리모음입니다.
/etc/pam.d/sshd 파일을 수정해줍니다.
PAM 문법 및 구조
type control module-path module-arguments| 기본문법 | 설명 | ||
| type | PAM에 어떤 타입의 인증이 사용될지 명시 account : 계정이 서비스에 대한 접근 허용되는지, 패스워드가 만료되었는지 결정 auth : 패스워드 또는 보다 정교한 방법을 통해서 인증하는지 parrword : 패스워드를 통해 인증하는지 session : 계정이 인증받기 전후 해야할 목록 기제 |
||
| control | PAM에게 할 동작을 명시해주는 필드 requisite : 해당 인증 실패시 바로 거부 required : 해당 인증 실패시 다음 모듈 인증 후 거부 sufficient : 해당 인증 성공 시 아래 인증들 없이 인증 성공 optional : 해당 모듈은 인증 실패 여부와 관계없음을 명시 |
||
| mopule-path | 모듈경로 | ||
| module-argument | 모듈에 전달될 인수 지정 | ||

common-auth인증 부분을 가져와 모듈에 추가하는 @include common-auth 명령어를 주석처리 후
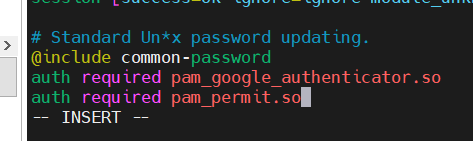
password-auth인증 아래 상기 2개의 PAM명령어를 작성합니다.
OPT를 사용할 EC2(Bastian host)의 ssh/sshd_config 파일 수정
/etc/ssh/sshd_config 설정정보파일을 수정해줍니다.
ChallengeResponseAuthentication : ChallengeResponse 허용 여부를 yes로 변경해줍니다.AuthenticationMethonds 명령어로 인증 순서를 명시해줍니다.

sshd 재시작
모든 설정파일을 수정했으면 sshd을 재시작해줍니다.
이제 모든 설정이 끝났습니다!
sudo systemctl restart sshd.service
OPT인증
해당 터미널을 나가서 새로운 터미널로 접속하면 otp인증하라는 메시지를 확인 할 수 있습니다.

mobaxterm을 통해 진행했는데, 저기다 치면 인증안되고 터미널에 직접 쳐야 인증이 되더군여..
OPT인증
발급받은 OTP를 ec2에 입력해주면 Bastian-host에 정상적으로 접근 할 수 있습니다.

Private EC2 접근
ssh -i "키파일" private-ip를 통해 ec2에 접근 하여
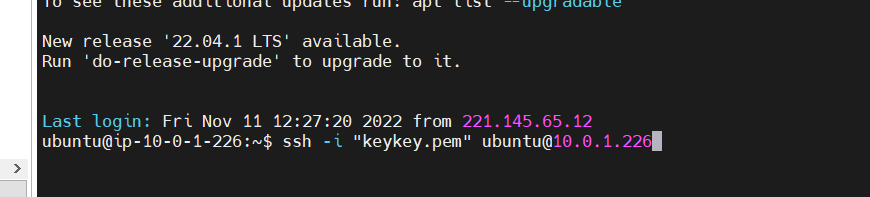
진행 하면 privateEC2에 정상 접속을 확인 할 수 있고

ping 명령어로 nat-gateway정상 작동까지 확인했습니다.

'aws' 카테고리의 다른 글
| CI/CD Pipeline - AWS CodePipeline을 통한 CICD 해보기 with Terraform (0) | 2023.03.05 |
|---|---|
| ALB와 ASG 만들기 with Terraform (0) | 2022.12.02 |
| EC2에 EBS볼륨(LVM) 마운트하여 사용하기 (0) | 2022.10.23 |
| AWS NAT gateway란? (0) | 2022.09.26 |
| AWS ROUTE53 Rounting Policy에 대해서 알아보자 (0) | 2022.09.23 |


